Slitherlink Ultimate Guide
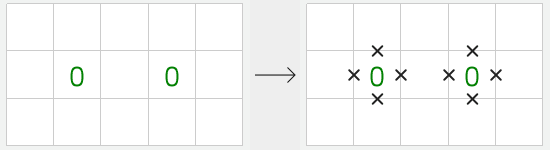
No lines around zero-clues
The starting point for Slitherlink puzzles is to look for the zero-clues. These
clues don't have any lines around them, so we can immediately mark them as empty
with a cross:
Forced lines
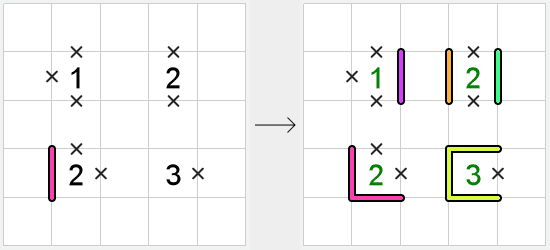
Look for clues that have exactly the right number of available sides remaining
to satisfy that clue - some of them might already have some lines filled out:
Forced Crosses
The aim of Slitherlink is to draw a single loop round the grid satisfying all the
clues - you don't need to insert any crosses to complete the puzzles.
But, inserting crosses on sides that can't be a line will help you with solving the puzzle.
But, inserting crosses on sides that can't be a line will help you with solving the puzzle.
The two main ways a side can't be a line are,
- Satisfied clue - if a clue is satisfied, none of the remaining sides will be a line.
- Prevent T-junctions - T-junctions (and crossroads) aren't allowed in Slitherlink, so these sides can't be a line either.
Implied Lines
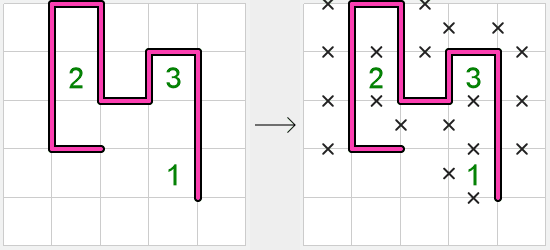
We know that the solution has to be a single loop round the grid, i.e. there can't be any dead-ends, and the line
has to continue.
If we have the end of a line that can only be extended in one direction, then the line must be extended in that direction. You can sometimes extend lines along several sides by following this rule.
Inserting crosses everywhere makes it easier to spot this kind of situation.
If we have the end of a line that can only be extended in one direction, then the line must be extended in that direction. You can sometimes extend lines along several sides by following this rule.
Inserting crosses everywhere makes it easier to spot this kind of situation.
No sub-loops
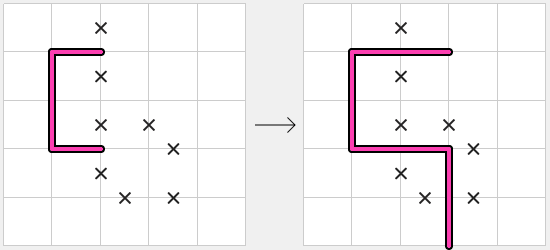
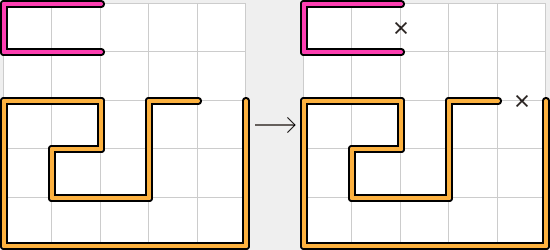
A Slitherlink solution has to be a single loop, i.e. it's not allowed to have 2 (or more) loops. This
means that if you see a smaller loop where the ends are just a single side apart, this side can't be
a line - otherwise the puzzle would contain multiple sub-loops.
Implied Crosses
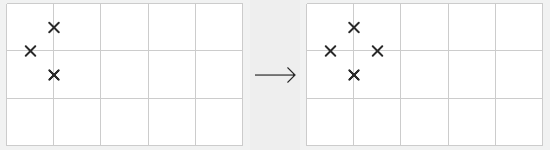
We know that our loop can't contain any dead-ends, so if you see a side where you can't insert a line because it
would create a dead-end, then you can insert a cross on that side.
Adjacent 3s
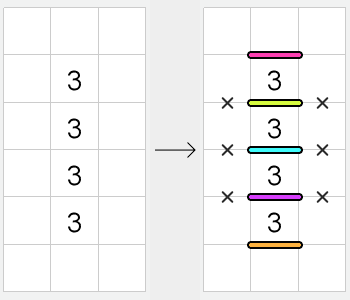
If we have two adjacent 3 clues, there are some lines and crosses we can fill in.
There are only two paths the loop can follow around adjacent 3s:
There are only two paths the loop can follow around adjacent 3s:
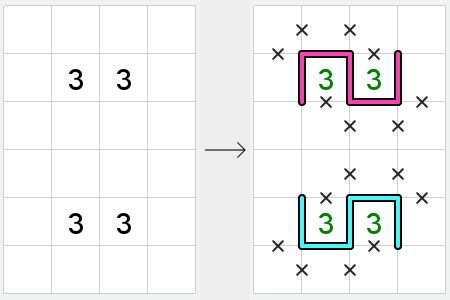
There are lines and crosses in common for both of these possible paths - we may not know exactly which path
the loop will take, but we can insert the lines and crosses that are common in both possiblities.
The same is true for adjacent 3 clues that are arranged vertically.
The same is true for adjacent 3 clues that are arranged vertically.
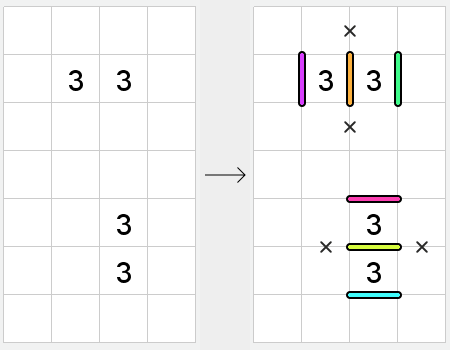
We can apply the same reasoning if we have more than two adjacent 3s:
Diagonally adjacent 3s
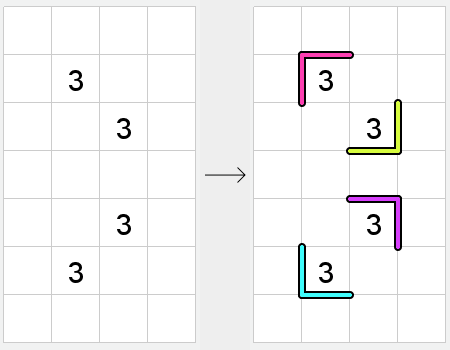
Diagonally adjacent 3s also have a limited number of possible paths we can look at:
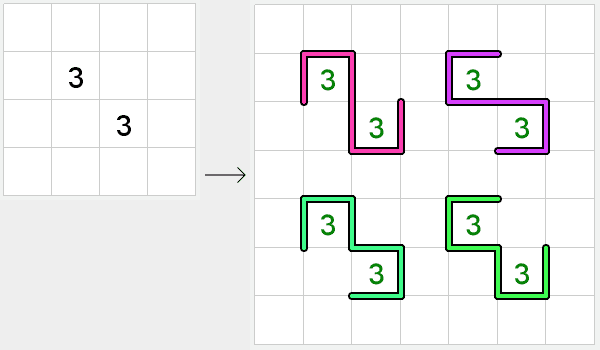
Diagonally adjacent 3s have more possible paths, but there are still some common lines we can insert:
Special cases for 1 clues - in a corner
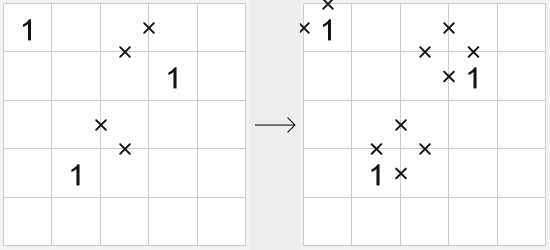
If we have a 1 clue in a corner - this could be in the corner of the puzzle, or it could be in an artificial
corner because of the crosses on the surrounding sides. There is no way for us to only insert a single line
on those sides making up the corner, so those sides have to be a cross:
Special cases for 1 clues - line approaching
In specific situations where we have a line approaching 1 clue, where the line has to follow
one of the sides of the 1 clue, there are 2 possiblities:
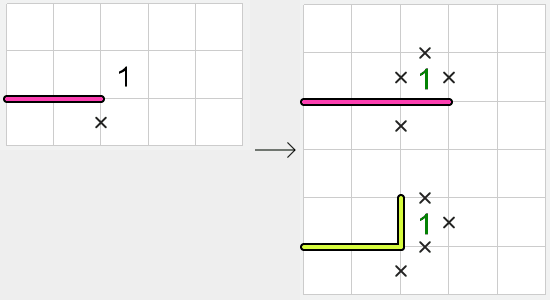
We can insert crosses for the two sides that are never going to be a line.
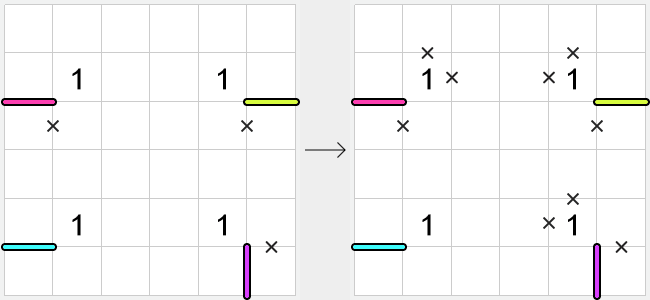
Note that if there is another route for the path that does not involve the sides of the 1 clue (as in the bottom-left), we can't apply this technique.
Note that if there is another route for the path that does not involve the sides of the 1 clue (as in the bottom-left), we can't apply this technique.
Special cases for 2 clues - corners
In this kind of situation where we have a 2 clue with a closed corner, there are two options the path
could take here:
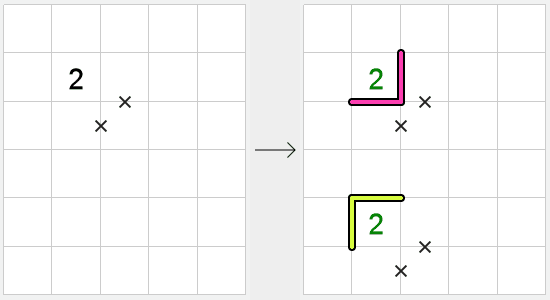
This doesn't help us directly, but if the second option above is not available, we know the path
must follow the first option.
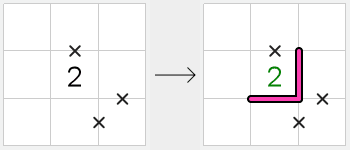
Also note that the start/end of the path are in the same place for both options. The path
must continue from these points, so we can look to see if there is only one option
for how the path must continue.
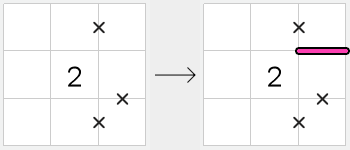
In this example we know that the path must pass to the left/above the 2 clue, or below/to the right. We
don't know which option is the solution, but we know the path passes through the top-right corner of the 2 clue.
From here, there is only one option for how the path continues - to the right.
Special cases for 3 clues - corner
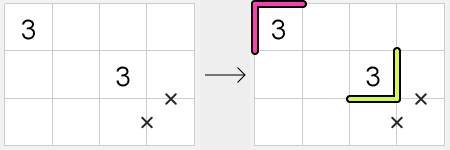
If we have a 3 clue, we know that only one of the sides will be a cross, i.e. won't be a line.
When one of the corners around a 3 clue is closed like below, we know that both those sides must
be lines (otherwise they both wouldn't be lines, which isn't allowed by the 3 clue).
Special cases for 3 clues - diagonally next to 0
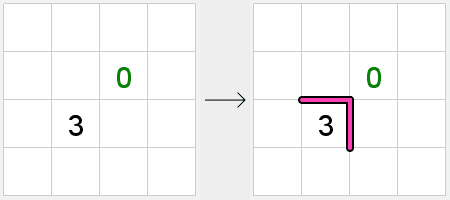
If we see a 3 clue diagonally next to a 0 clue as below, we know that the 0 clue will be surrounded by crosses, so we could
immediately apply the corner special case and fill in two of the lines around the 3 clue.
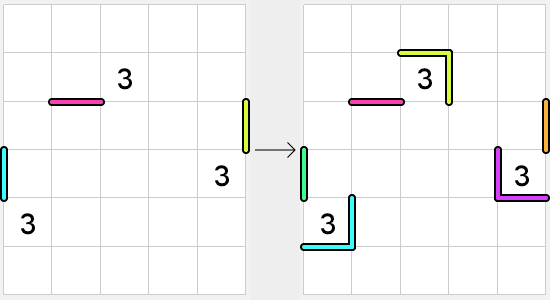
Special cases for 3 clues - line meeting 3
If we have a line meeting a 3 clue, there are only two ways the path can satisfy the clue:
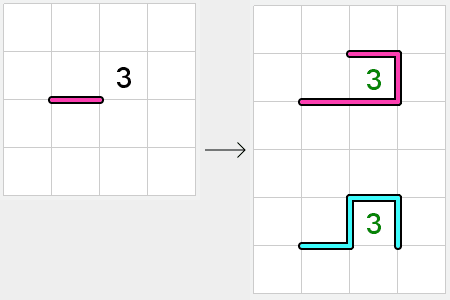
We don't know the exact path around the 3 clue, but we do know that the two diagonally opposite sides will be lines:
Contradictions 1
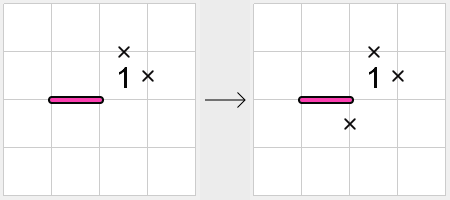
Look for sides where if you inserted a line or a cross, this would lead to a contradiction. In the below situation, if
the path was to continue downwards, this would mean that we have no way to satisfy the 1 clue:
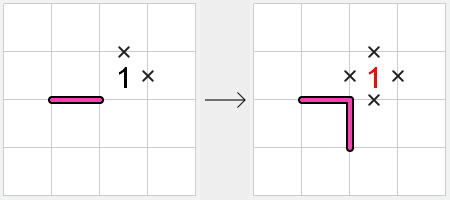
In these kind of situations, we can insert crosses:
Contradictions 2
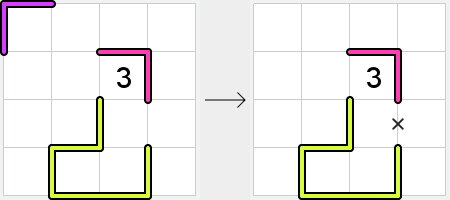
This is another situation where inserting a line on a side will lead to a contradiction - in this case a separate closed loop.
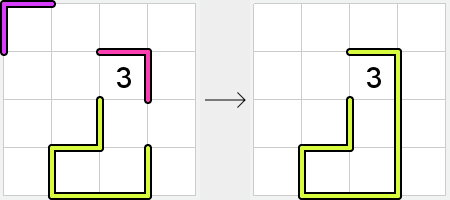
To satisfy the 3 clue in this grid, the only option we have left is to insert a line on the left side of the 3 clue. This
would give us a separate closed loop, which is against the rules, i.e. we can insert a cross on this side instead.
Contradictions 3
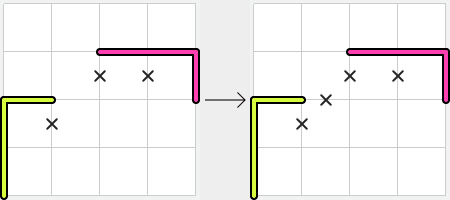
There's two ways the path on the left can be extended:
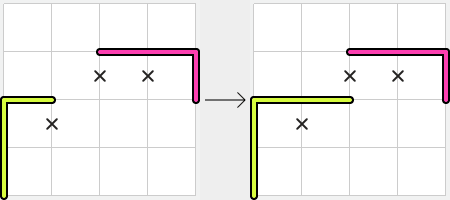
If it's extended to the right (as above), then this will leave the other path ending in an area it can't escape from, i.e.
it has left the puzzle in an impossible state.
Conclusion
These are all the techniques you need to solve the PuzzleMadness Slitherlink puzzles (including the Giant Slitherlink
puzzles). If you can't see a way forward with a puzzle, try inserting all the crosses that you can - this gives you
clarity on a puzzle.